November 26, 2006

Brie en Croûte

This is a wonderful appetizer that I served for Thanksgiving this year. It's extremely easy yet really impressive. So, in other words, it's exactly what you want when you're preparing so much other food for a huge meal!

There are many variations of baked brie. I decided to top mine with fig preserves and sliced almonds before wrapping it in the puff pastry, which was a huge hit. I've also had it with raspberry preserves, which is also amazingly good! There is a traditional French recipe where the wheel of brie is cut in half and cooked mushrooms and shallots are sandwiched in the middle, then wrapped in pastry. I've never had any purely savory variation, but have seen recipes using sundried tomatoes, as well as the mushrooms. As I'm not a huge fan of the baked bries that are topped with lots of nuts and brown sugar, I find this recipe a perfect middle ground; slightly sweet but without overwhelming that expensive round of brie you just bought! Experiment away!

Baked Brie with Sliced Almonds and Fig Preserves

1 sheet frozen puff pastry
about 3 Tbsp fig preserves (or any seedless jam you like)
2-3 Tbsp sliced almonds, toasted
1 (13.2 oz) wheel brie (maybe 5-6 in. diameter)
1 egg + 1 tsp water

Thaw the puff pastry sheet by removing from the freezer 30 minutes before you start to assemble the appetizer. Lightly beat the egg with 1 tsp of water to make an egg wash. Set aside. Preheat the oven to 400 degrees F (200 degrees C).

Once flexible, unfold the pastry into a square on a lightly floured surface. Roll out the pastry slightly, to about 1/8 in. thick. Spread the preserves in the middle of the pastry in a circle the same size as the wheel of brie. Sprinkle the almonds over the jam and place the cheese on top.

Bring 2 opposite sides of pastry up and over the cheese. Fold in the other sides, trimming any extra, and "glueing" it together with a small amount of egg wash. Place seam side down on an ungreased baking sheet. Decorate the top with the scraps of pastry if you like. Using a pastry brush, brush the entire thing with egg wash. Bake for 20-25 minutes, until golden brown. Let stand at least 30 minutes or up to an hour before serving. Serve with water crackers or toasted baguette slices.

This is equally delicious 2 ways: after just 30 minutes, so that the brie is still hot and oozes out of the pastry, or bake it way ahead of time and let it cool at least an hour so that it can firm up and be easily sliced.

November 21, 2006

The NY Times' Autumn Crêpes

I was so excited to see this recipe and article by Celia Barbour in The New York Times. I'd never seen a crêpe recipe like this printed anywhere (except for this glorious recipe given to me by my brother-in-law's Swiss girlfriend). Don’t Buckwheat Crêpes with a Roasted Cauliflower, Parsnip and Leek filling just sound amazing? I know most Americans aren't avid crêpe makers, but it's about time we joined the club. I knew I had to make this recipe so I could once again push my crêpe agenda on all of you!

You know how sometimes cooking is a hassle? And how sometimes you're just too tired and grumpy to get any enjoyment out of it? Well, try making these. Crêpe making can be a form of meditation if you think about it. You whip up the simple batter, heat a pan, pour in a ladle-full, smear it around until you've constructed a nice circle, wait, and flip. Repeat. And repeat and repeat. And each one gets better and prettier and you feel more and more proud of yourself. Oh, and you're sipping wine. And with each minute that passes by, you become more comfortable with your now near perfect crêpes and a lot less preoccupied with whatever you were worrying about before you started this whole process. And you swear it's the happiest you've been all week.

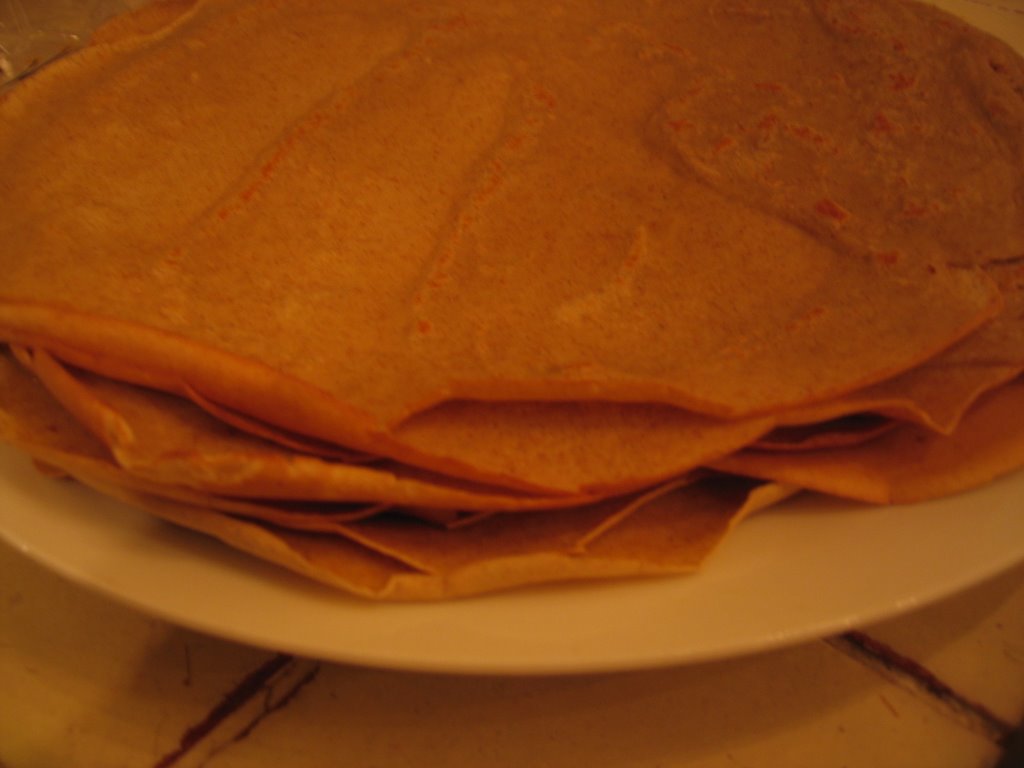
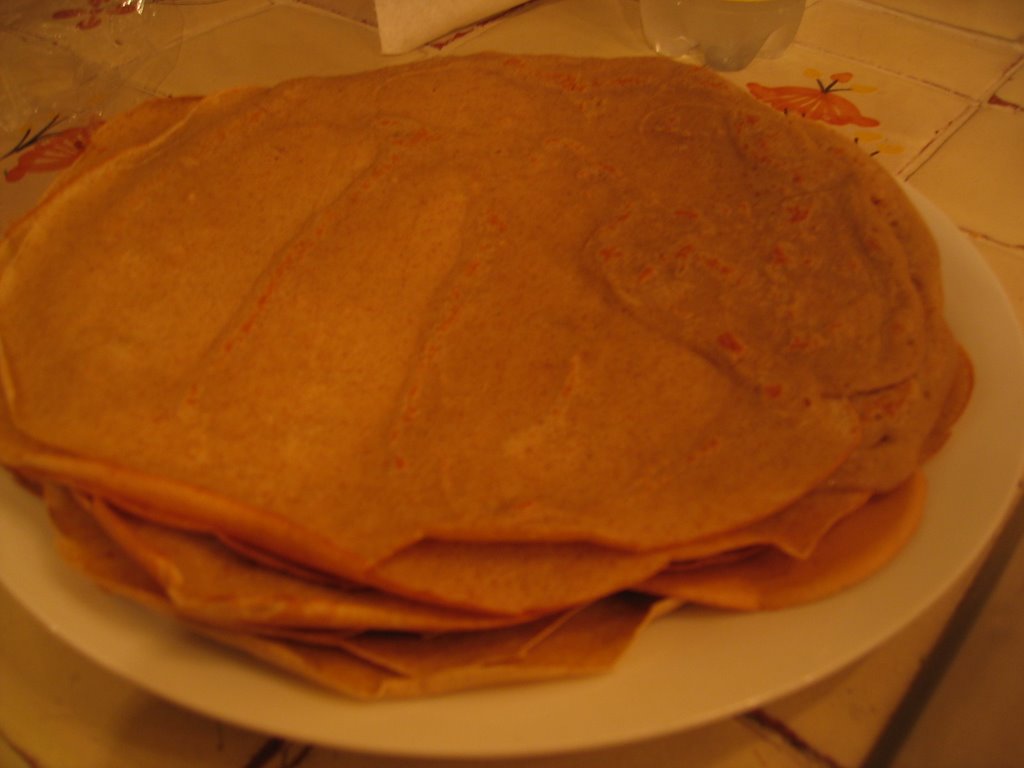
This recipe gave me the opportunity to make buckwheat crêpes, or galettes au sarrasin, for the first time. In France, savory buckwheat crêpes like these are always called galettes and the word crêpe is reserved only for sweet crêpes. This recipe was incredibly tasty, but I would have preferred an even stronger buckwheat flavor. You'll probably agree if you've had crêpes in Brittany, but if you are doubtful about buckwheat, this recipe will be a perfect place to begin. It's like a whole wheat crêpe; slightly nutty but with a delicate texture.

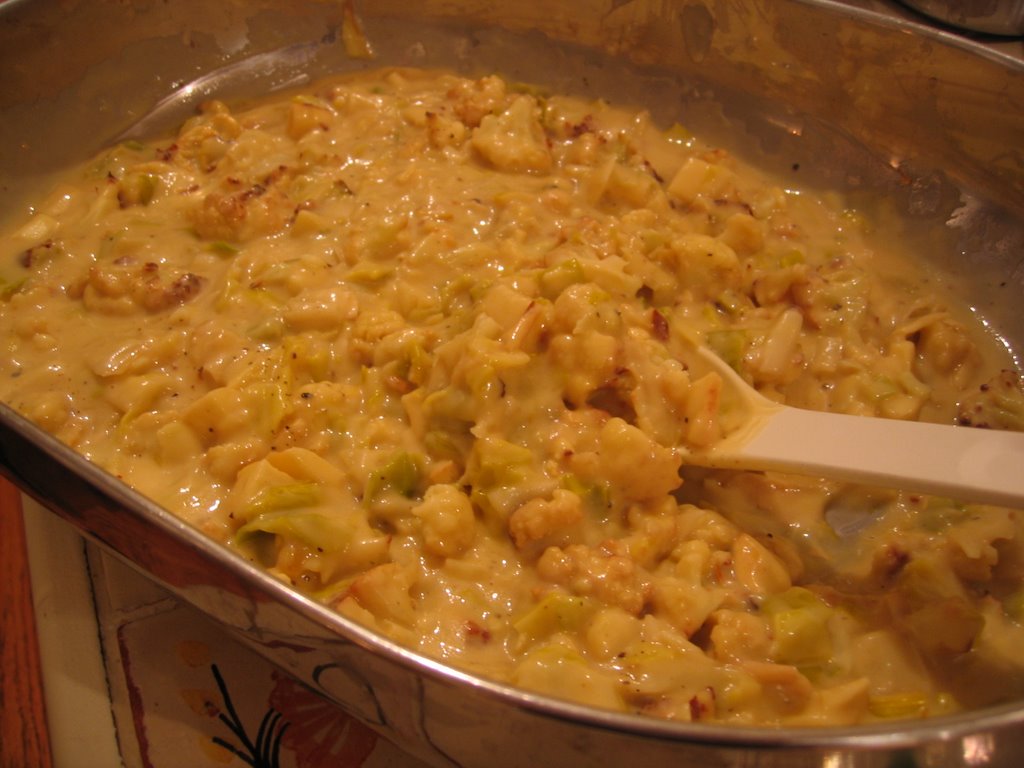
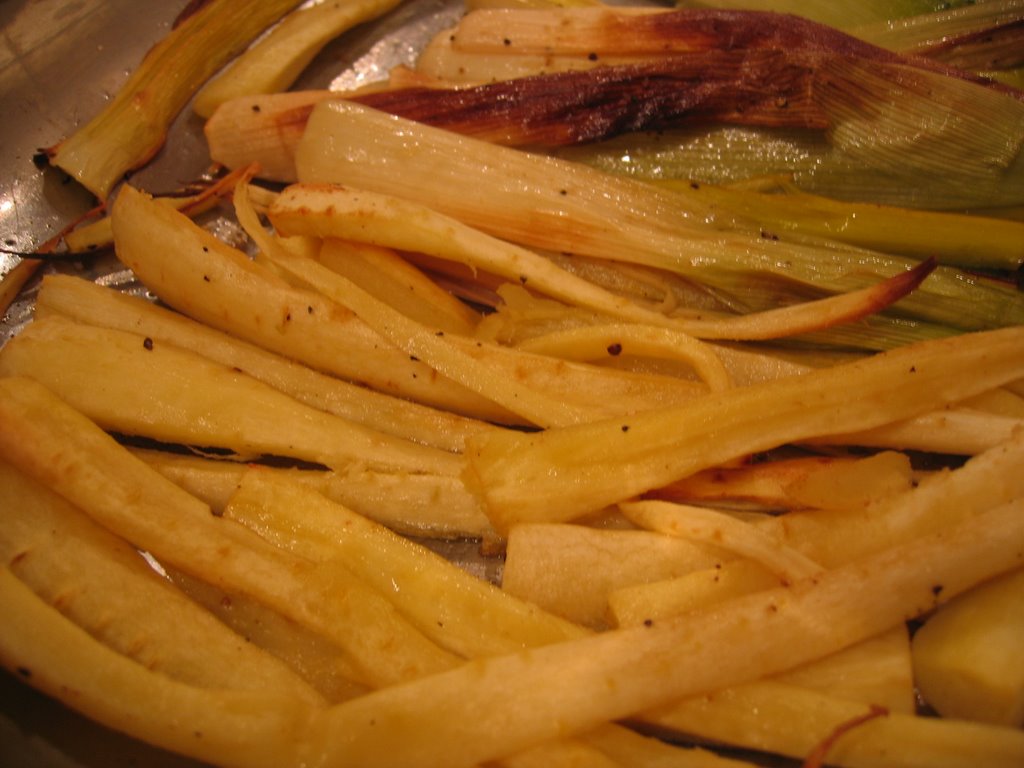
The word delicate sums up this roasted cauliflower, leek and parsnip filling as well. I'd never tasted a parsnip, let alone cooked one, so the flavor was such a pleasant surprise. For all the other root-vegetable-dummies out there, parsnips are shaped like carrots, white in color, and have a more delicate flavor, yet a slightly more fibrous texture. They are wonderful! Who knew? Why aren't we eating more parsnips? I'll spare you my embarrassing episode at The Co-op where I almost bought a huge sack full of Daikon radish. Evidently, I needed some help deciphering my root vegetables.

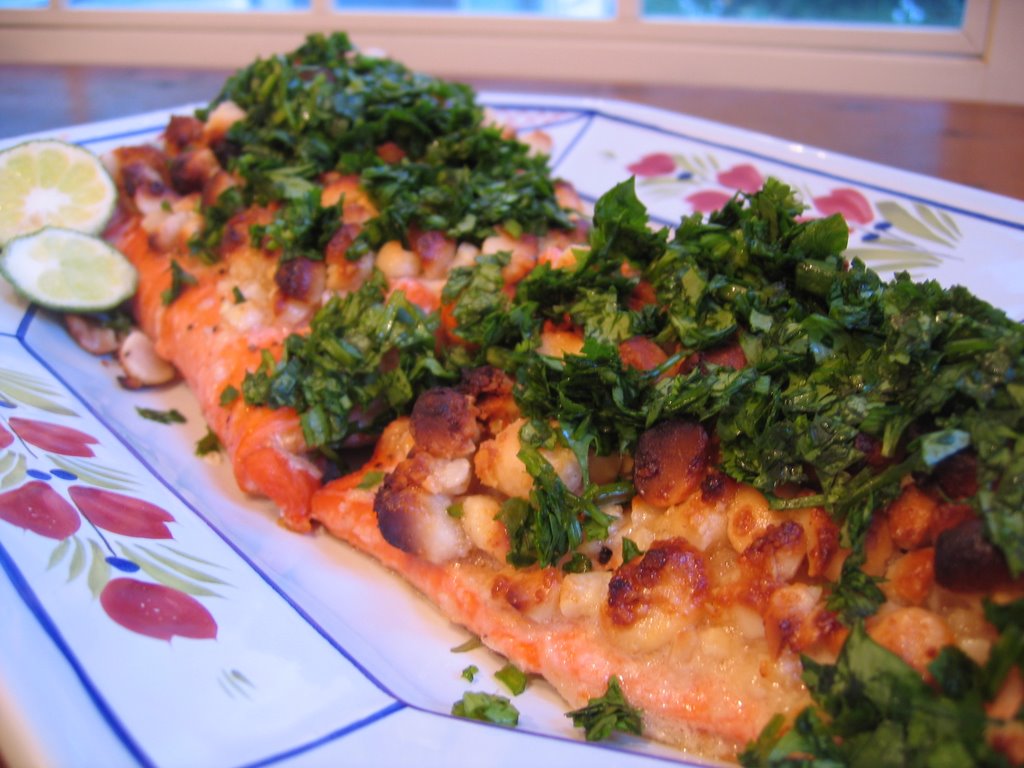
The title of the filling indicates roasted vegetables, which is true, but the really amazing part of the recipe is the custardy sauce in which those veggies take a bath. Honestly, I know you aren't supposed to rave about your own food, but I couldn't wipe the goofy smile from my face when I was eating this. I could go on and on about how the texture of the buckwheat crêpe works so well with the silky and subtle vegetables, but I'll just say this: Hurry up and make these!
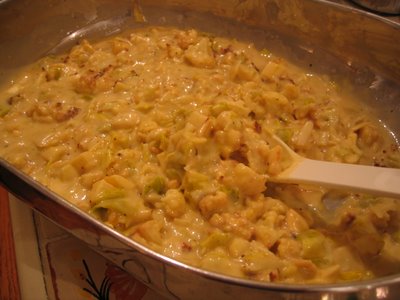
Treat someone you love to this luxurious French meal. You can fill and roll the crêpes if you like, or just serve the warm crêpes and filling separately on platters and let guests make their own. A green salad makes a lovely side. I don't know how anyone could resist the love in this dish. It's an elegant meal that is sure to make anyone feel special.

*Note* I doubled this recipe since the leftovers are wonderful. If serving 4 or more, I recommend this. However, I had quite a bit of leftover sauce, so no need to double it, more like 1 1/2 times the recipe would work.

Buckwheat Crêpes

½ cup buckwheat flour
½ cup whole wheat flour
½ cup all-purpose white flour
4 eggs
1 tsp salt
1 cup whole milk
2/3 cup water
4 Tbsp melted butter

Melt the butter in a small dish in the microwave or in a saucepan. Set aside to cool slightly.

Stir together the flours and salt. Beat in the eggs and gradually add the milk and water. Whisk the mixture well until completely smooth. Add the butter and whisk until smooth once more. This can also be made in the blender, pulsing for one minute. Refrigerate the batter for one hour. Stir well before using.

Lightly oil or butter a wide skillet or crepe pan and place over high heat. The pan should be almost scorching hot. Lift the skillet from the heat with one hand and pour about 1/3 cup of batter into the pan with the other, all while tilting the pan so that the batter spreads out into a circle. You will need to spread the batter out with a spatula, which feels awkward at first, but after a few times, you'll be quick about it. Put the pan back on the heat and cook 1-2 minutes until the crêpe dries a bit and easily lifts off the bottom of the pan. Flip it over and cook 30 seconds to 1 minute on the other side. Repeat with remaining batter. Makes 12 small crêpes, but I made about 8 large.

Roasted Cauliflower, Parsnip and Leek Filling

2 lbs cauliflower (about 1 medium), cut into small florets
2 large leeks
¾ lb parsnips (about 3 medium), peeled
5 Tbsp melted butter, divided
1/3 cup olive oil
½ tsp freshly ground pepper
2 tsp dry mustard
2 tsp salt
3 egg yolks
2 Tbsp heavy or light cream, or whole milk
3 cups vegetable or chicken broth
3 Tbsp flour

Preheat the oven to 425 degrees F. In a small bowl, mix together 2 Tbsp melted butter, olive oil, pepper and mustard. (I think 2 Tbsp butter and ¼ cup olive oil is probably plenty, if you’re concerned.) Drizzle about 2/3 of this mixture over the cauliflower florets. Sprinkle with 1 tsp salt. Spread out on a baking sheet and roast for 10 minutes.

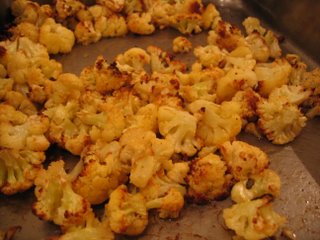
Half the leeks lengthwise, almost to root end, leaving in one piece. Cut the parsnips into quarters lengthwise and remove any tough core, although if you have small parsnips, this is unnecessary. Combine the leeks, parsnips and remaining butter/olive oil mixture and remaining 1 tsp salt. Spread out on a separate baking sheet, or add to the cauliflower pan if there is room. Return vegetables to the oven and roast for 20 minutes. Reduce the heat to 325 degrees F and roast until golden and tender, another 20-30 minutes.

Transfer leeks and parsnips to a cutting board and chop into ½ inch pieces. You can chop the cauliflower, too, but mine seemed like a fine size already. Set aside.

In a mixing bowl, combine the egg yolks and cream. In a small saucepan, bring the broth to a simmer. In different saucepan, whisk together the remaining 3 Tbsp melted butter and the flour. Stir and cook for 2-3 minutes but do not brown. Gradually whisk in the broth until incorporated and the sauce is smooth. Bring to a simmer over medium heat and let the sauce thicken.

Take off the heat for a few minutes, then whisk very gradually into the bowl with the egg yolks and cream. Do this slowly so that the egg yolks don’t scramble! Once all the broth mixture is added to the egg yolks, return all of it to the saucepan and keep over medium heat; do not boil. Add the vegetables to this sauce and keep warm.

Assemble the crêpes yourself, or pour the vegetables and sauce onto a deep platter so that guests can make their own. Sprinkle with chopped fresh parsley to garnish. (If assembling ahead of time, reserve some of the sauce sans vegetables to top the finished crêpes.) Place about 1/3 cup filling into each crêpe and roll up burrito-style. Place the filled crêpes in a baking dish. Cover with a bit of the reserved sauce and bake for 15-20 minutes at 350 degrees F, or until warmed through.

November 18, 2006

Tuna Casserole...it's back!

Even if you never grew up eating Tuna Casserole, you've probably heard the lore. One of the classic cream-of-mushroom-soup casseroles, traditional tuna casserole is even topped with crushed potato chips. Obviously, we can do better.

Many people seem content to use canned soup in cooking. I'm over the fact that it's unhealthy; what really bugs me is that it tastes bad! It really does. If you don't mind the flat taste of such "foods" like Taco Bell, Domino's Pizza or anything from McDonalds, you probably don't mind canned soup, which makes sense. Our palates have become increasingly narrowed and numbed with sodium, hydrogenated oils and high fructose corn syrup. I truly believe that the canned soup casseroles were born out of an effort to make comforting food quickly and mindlessly, but the cost (and I'm not talking $$$) is that we've lost interest and knowledge about what the real food is that we're after.

This version of Tuna Casserole is fast, easy, and one thing that the canned soup version is not: delicious. You are worth more than Campbell's has to offer. You deserve whole mushrooms and real cream in your sauce. We deserve to enjoy these favorites without chemicals, trans fats and cheap ingredients that serve the lowest common denominator while corporations get rich. The food industry has done us a huge disservice, but we can take back our food. We can still make our favorites while proving that American food doesn't have to mean processed food in huge quantity. We deserve real food that does more than just make us feel full.

I can't help but get a little preachy when it comes to casseroles. They've gotten a lot of blame for the state of our country's health, as well as the boring American palate. But, with this version, I see light beaming out of this tunnel. Fresh tasting and comforting, it contains real vegetables and a fresh bread crumb topping. White wine perks up the cream sauce so it's not overly rich. I hope you'll enjoy it and feel good about it, too! Not always the biggest fan of tarragon, I really enjoyed it in this recipe and could have used even more. This is also the first Rachael Ray recipe I've tried in quite a while and was very pleasantly surprised!Tuna Casserole with White Wine Tarragon Cream Sauce
(recipe from Rachael Ray)

1 pound medium shell pasta
1 Tbsp olive oil
3 Tbsp butter
2 celery stalks, finely chopped
1 medium onion, finely chopped
1/2 red bell pepper, finely chopped
1 tsp dried thyme
1 1/2 Tbsp all purpose flour
1/2 cup dry white wine
2/3 cup chicken broth
generous 1 cup heavy cream or half & half
salt & pepper
dash cayenne pepper or hot sauce
2 (6-oz) cans (or 1 12-oz pkg) tuna packed in water, drained
1 cup frozen peas
6 sprigs fresh tarragon, leaves removed and chopped
4 slices sandwich bread (wheat or white)

Bring a large pot of water to a boil. Salt the water well and add the pasta. Cook according to package directions, 8 minutes, I believe.

Tear apart the bread slices into small pieces and add to the bowl of a food processor. Pulse lightly until the bread crumb texture is reached. Place in a small bowl and mix with a small amount of olive oil or melted butter. Set aside.

In a wide sauté pan or high-sided skillet, sauté the onions, celery and bell pepper in the olive oil and butter until onion is translucent. Sprinkle with dried thyme, salt and pepper. Once the vegetables are fully cooked, sprinkle in the flour. Stir until a paste forms on the veggies and cook 2 minutes. Deglaze the pan with the white wine, scraping the bottom of the pan as you go. Let the wine cook down for 2 minutes.

Add the chicken broth and cream and bring the mixture to a simmer. Add a dash of cayenne pepper or hot sauce. Check seasonings. Stir in the flaked tuna, peas and tarragon and heat through. Taste again, adding more tarragon if you like.

Drain the pasta when finished cooking and toss with the tuna mixture. Pour into a greased 9x13 casserole and top evenly with the bread crumbs. Bake at 400 degrees F (200 degrees F) for 20-25 minutes, until lightly browned on top and heated through.

November 15, 2006

Last Weekend in D.C.


As I mentioned quite a while ago, Paul and I are moving to Washington, D.C. soon. I’m very excited for this. Moving is generally a stressful thing, but it is doubled in intensity when it’s to a new city! I flew out there this past weekend to look for a place to live, and let me tell you that life magically worked out once again, despite my fear that it couldn’t possibly. I found a wonderful place in only 2 days. Well, 3 weeks of worrying about it, 2 more weeks of hard online searching and 2 days of physical shopping. Not bad, eh? Technically we’re going to live in Alexandria, Virginia, but still in what they call the metro area, since it is indeed served by the metro, making it very easy to get to The District.

The move will take place in mid-December so until then, I can simply organize and pack with the calm assurance that I do have a place to call home. Honestly, DC seems like a pretty great place. Everyone was incredibly friendly and the city doesn't seem very intimidating, at least to this former-Parisienne. Although, I wonder if it's just because everyone speaks English...hmm. I was actually a little nervous to visit since, you know, I better like it since that's where we're living! One often hears about the hectic D.C. traffic and busy pace, but I found it to be actually a lot less crazy than Paris. Oh, no one parks on the sidewalks? Why isn't everyone lining up as close as they can possibly get to the subway doors before they open in order to more easily shove your way onto the train and claim your space? Where's the aggressive city attitude? Why doesn't the metro smell like urine? And more importantly, when shoved by some lady with a large purse, why didn't it feel okay to shove back even harder while maintaining the ambivalent funeral gaze that excuses Parisian women of so much of their naughty behavior? It might be wrong that I miss that side of Paris...

In D.C. we used the metro on a Friday night around 6:30 pm and I could stand comfortably with my own personal space bubble around me. Plenty of room! My French friends would never believe it. "I'm telling you - I could expand my rib cage when I took a breath! It was amazing..." Why wasn't my face in some guy's armpit and somebody's little dog pressed up against my shins, with a purse shoved between my thighs and the only thing to hold on to was the flat glass panel on the door? I didn't know how to handle all that comfort! I'm glad I don't have to put on that face every day anymore, but it certainly made me tough, and I really miss it. Paris was never boring, that is certain!

But back to D.C. The low buildings and colonial architecture make the city incredibly beautiful yet cozy, too. It almost felt like a midwestern city to me - people seemed casually dressed and extremely friendly. I guess in Paris it really is all about fashion! I know that with the political arena out there everyone is working incredibly hard so there is a certain yuppie-vibe to certain areas, but overall, I’m really looking forward to getting to know the city. History was such a rich and intriguing part of living in Paris, so I’m excited to live somewhere with so many monuments and so many stories.

Plus, there are the crab cakes! Oh! (And I can’t believe it’s taken me 4 paragraphs to get to this…) I was there for 3 days and I had crab cakes twice, so I’m feeling as if I can stand to wait another month or so before I get to eat them again. I don’t even think we went to any restaurant that was particularly known for their crab cakes, but it didn’t matter. Compared to what you find in the Midwest, well, there’s no comparison. I’ve gathered that the most common presentation of crab cakes is the crab cake platter. Two lovely cakes were served with coleslaw, fries or onion rings and a delicious remoulade sauce with capers. It struck me as funny that at the much nicer restaurant we dined at the next evening, the platter idea was repeated. I ordered the crab cakes again, which came with a lime aioli, jicama and apple slaw, and yucca fries, of all things. Both were excellent. Do check back here in a few months and I’m sure I’ll be able to tell you where I go for the best crab cakes!

Also, I just want to take this opportunity to thank everyone who reads Chez Mégane now and again. I'm not posting as much as I'd like to right now, but by the time we're settled out there, Chez Mégane hopes to be back to her old pace with much to say about her new home city!

November 13, 2006

White Bean, Kale and Sausage Soup

I’ve made this soup many times, but I hadn’t made it in 2 years until last week. I’m sure most of you have made this, or at least, heard of this soup, in one of its many variations. I first made it after it graced the cover of an issue of Bon Appetit in either 2001 or 2002. I love this soup’s simple yet hearty flavors. It’s incredibly easy and really good for you! Plus, I’m always partial to rustic dishes like this – there is something so comforting about it. I’ve also come to learn that I love dark greens. I may not love salads, but I could eat braised kale every night of the week. I’m even going to start adding kale to my vegetable soups. Although, it doesn’t impart much flavor, I love the texture it adds.

Since I could never seem to find kale in Paris, (or the sausage, for that matter!) this recipe was forgotten about. But, it’s wonderfully adaptable and a good reminder of how easy it is to make a comforting soup! I’ve made this before with potatoes or small shell pasta instead of the white beans, and I’m going to try different sausage next time. The smoked variety has a nice flavor, but it’s mild, so a spicy Italian sausage might be more up my alley next time. Chorizo would be excellent, as well, for a Portuguese version. Plus, I’m not really crazy about using the grocery store smoked kielbasa in the first place – meat products like that have all sorts of additives in them that make me nervous.

Check out more information about why kale is so good for us!

White Bean, Kale and Sausage Soup

1 Tbsp olive oil
1 medium onion, chopped
5 gloves garlic, minced
1 bay leaf
freshly ground black pepper
Generous 2/3 of one large bunch kale, washed
2 (15 oz) cans white beans, rinsed and drained
¾ (16 oz) package smoked sausage, kielbasa, or Italian sausage links, sliced
6-8 cups chicken or vegetable broth

Optional - drop a chunk of the rind of your block of parmesan cheese into the soup as it simmers. Remove before serving.

Heat the olive oil in a large pot over medium high heat. Add the sausage slices and sauté until nicely browned. If using uncooked sausage in casings, sauté until fully cooked. Add the chopped onion and garlic to the pan. Cook until translucent, about 3-5 minutes.

Tear the kale into bite size pieces and set aside. Deglaze the pan by pouring in a small amount of broth and scraping the bottom of the pot. Pour in the rest of the broth and bring to a boil. Add the bay leaf and pepper. Once the broth is simmering, stir in the kale, cover, and simmer 10 minutes until the kale is wilted completely. Stir in the white beans and cook 5 more minutes until heated through. Serve with some crusty bread and grated parmesan. Serves 8.

November 7, 2006

Pumpkin Bars...Again!

(No, that empty space wasn't the size of my serving...)

Yes, I've already posted this recipe, but it was almost a year ago, before anyone was actually reading my blog, so I feel okay about re-posting. Plus, these are worth it, and after having made these recently, I feel a renewed excitement about their success.

It's already November! It is time to make these pumpkin bars! What could you possibly be waiting for? Sure, unless you're a family of at least 4, with half of you being sugar-hungry children, you won't possibly finish all of these and have to throw the rest out, but at least you will know a really good recipe. My solution would be to take these to the office party or neighbor's potluck and watch them disappear! These are my favorite way to warm up to the Thanksgiving season. Plus, I don't know about you, but I love that the recipe only uses the 1 cup, 2/3 cup, and 1 teaspoon measuring devices: less to clean, less to fidget with. The 1/4 teaspoon is just a few shakes, anyway, right?

Paul's Pumpkin Bars
(adapted from allrecipes.com)


4 eggs
1 cup vegetable oil
1 2/3 cups white sugar
1 can (15 oz.) pumpkin puree
2 tsp. baking powder
1 tsp. baking soda
2 cups all purpose flour
1 tsp. salt
2 tsp. cinnamon
1/4 tsp. each nutmeg, clove, (and ginger, optional)

Beat together the eggs, oil, sugar and pumpkin until smooth. Sift together the dry ingredients, including spices, and then slowly mix them into the egg mixture. Once incorporated, pour into a 10x15 jelly roll pan. (As I do not own one of these, I pour 2/3 of the mixture into a 9x13 and the rest into an 8x8.) Bake at 350 degrees F (180 degrees C) for 25-30 minutes. Frost bars once cooled.

Cream Cheese Frosting

3 oz cream cheese, softened

1/2 cup butter, softened

1 teaspoon vanilla extract
2 cups sifted confectioners' sugar

Beat together cream cheese and butter. Add sugar in small doses, mixing to incorporate. Mix in vanilla once frosting is smooth. Using an electric hand mixer makes this easy.

October 26, 2006

My Favorite Beef Stew

I love the Fall. Warm soups and stews are just begging to be made. Visions of pot pies float through my head. Some of my favorite fall dishes are braised dishes, like Bœuf Bourguignonne, and although the quintessential version that I made last winter is amazing, sometimes it’s a little on the heavy side. Plus, it’s a lot of work with all the separate steps of sautéing the bacon and mushrooms separately, not to mention caramelizing the pearl onions all while simmering the beef in yet another pot.

I wanted to make a beef stew to freeze and give to my Grandparents for their birthdays last week. (In addition to the stew, I made them 6 cute individual chicken pot pies and 2 meatloaves, which I think will help ease the burden of cooking a little bit.) The beef stew, however, was going to be our dinner that night, as well, so while I wanted something traditional that Grandma and Grandpa would like, I still wanted a lot of flavor.

There are many recipes out there for Beef Stew, but I’ve always found that if you don’t marinate the beef before braising it, the stew is almost always utterly flavorless. After having marinated the chunks of beef overnight and simmered the stew about 3-4 hours, the meat truly transforms and becomes incredibly tender. Turns out if you cook it all damn day, it’s pretty good! Actually, despite the long ingredient list, this is a pretty easy dish. Once you make it, you'll never go back to your shortcut stew. For a more elegant dinner, leave out the potatoes and prepare a fancier gratin or mashed potato on the side.

I combined parts of my bœuf bourguignonne recipe with a more traditional stew recipe to make this wonderful version. It’s rich with red wine and beef stock, but has added potatoes and a bit of tomato paste and brown sugar for a bit more depth, but not the salty bacon flavor of the French version. It’s a little boozy, but maybe that’s why it’s so damn good.

My Favorite Beef Stew

3 pounds lean beef stew meat
2 ½ or 3 cups dry red wine
2 cups beef broth
¼ cup brandy, cognac or dry sherry
2 bay leaves
3 cloves garlic, sliced or smashed
10 whole peppercorns
5 whole cloves
5 whole allspice berries, if you have them
1 tsp dried thyme
1 tsp dried rosemary
1 onion, sliced

Combine all the ingredients in a large ziploc bag that has been placed in a large bowl for support. Combine the marinade well. Place in the refrigerator overnight or at least 6 hours. Mine was in the fridge from 8 pm to noon the next day.

½ cup flour
2 Tbsp butter
2 Tbsp olive oil
2 Tbsp tomato paste
1 Tbsp brown sugar
1 large onion, coarsely chopped
3 carrots, peeled and cut into 2-in chunks
2 ribs celery, cut into 1-in chunks
3 idaho or Yukon gold potatoes, cut into 1-in dice
1 tsp dried thyme
1 tsp dried marjoram
½ cup frozen peas
1 cup sliced mushrooms
Fresh parsley, chopped
Additional beef broth, up to 2 cups

Strain the marinade from the meat, reserving all the liquid, but discarding the onion, garlic, peppercorns, bay leaves, and cloves. Set this marinade aside.

Melt the butter into the olive oil in a large dutch oven. Pat the meat dry with paper towels. Pour the flour onto a large plate. In batches, lightly coat the chunks of beef with flour and place in the dutch oven. Sear the pieces of beef until well browned on all sides, 4-5 minutes, and remove to a plate. Repeat with all the remaining beef.

Add more olive oil to the pan if needed and sauté the onions, carrots and celery until almost translucent. Stir in the tomato paste. Season the vegetables with salt and pepper. Deglaze the pan by pouring in about 1 cup of the reserved marinade and scraping up the browned bits from the bottom of the pan. Pour in the rest of the marinade, add the brown sugar, thyme, marjoram and beef to the pot, and bring it to a simmer. Simmer, covered, on low heat for about 2 hours. (This could alternatively be put in a crock pot and simmered all day on low and finished when you get home.)

After 2 hours, the beef is almost good enough, but we want it to be amazing, so add the potatoes at this point and keep it simmering. Add a bit more beef broth to keep all the vegetables covered and so it doesn’t get too thick. Let the potatoes cook for 30 minutes, then add the sliced mushrooms and frozen peas. Continue to simmer about 10 minutes of until the mushrooms are done to your liking. Stir in the fresh parsley and taste for seasoning. You may need to add salt and pepper, or beef broth for the taste and consistency you like. Of course, it will taste better in 3 days, but who could wait? I actually like the cleaner taste you get on day one. Serves about 9.

October 20, 2006

Chocoholics Beware!

One of the nicer parts about returning to Iowa City for a few months has been spending time with my family. Besides having both my parents and Paul's parents in the same town, I'm lucky enough to have my maternal grandparents here, too. They moved to Iowa City the year that I was born, having retired from farming in Illinois. They have been there for me my whole life and it's just now that I'm into adulthood that I realize what a uniquely special gift it is to have had grandparents so close when I was growing up.

My grandfather is turning 95 years old this week and my grandma will turn 94 next week. They are still living at home, still driving, and although their health has deteriorated in the last few years, I'm feeling lucky to have these kinds of genes in my family! Grandma was a good cook. Unfortunately, she hasn't been able to lately because of her health. She never made anything too fancy, but every Sunday we always sat down to a huge table of food. Pot roasts and potatoes were her specialty, so it's no wonder that my life wouldn't seem complete without occasionally gorging myself on mashed potatoes and gravy. Being farmers, even once they retired, they had a huge garden for years. Among their garden and fruit trees, Grandpa had to the most virile cherry tree I have ever seen. I have the fondest memories of being a little girl, picking the darkest red ones I could find and putting them right into my mouth straight from the tree. And I can just picture Grandma with a big bowl of cherries on her lap, pitting each one to go into a fabulous pie.

Chocolate pudding was the dessert Grandpa and I bonded over. Once I was old enough, I knew right where Grandma kept the box. She had almost an entire shelf devoted to Jell-O, most of it chocolate (with some pistachio for those Watergate Salad opportunities). As I got older, I decidedly sorted through the boxes to find the ones with the most current packaging, just to be on the safe side. Anyway, Grandma loves to tell about how whenever they were watching me, mostly when I stayed home sick from school, I would eventually make my way to that cupboard and say, "let's make Grandpa some chocolate pudding!" She always was tickled that I never said it was for me, but always for Grandpa. Grandpa also required large amounts of Cool Whip on top, too.

So, for this special birthday, I was given the task of making a very dark chocolate birthday cake. "Something Grandpa can taste..." said my Mom. I just told you about how I'm not much of a baker, but it seemed like I'd be getting some practice in.

I was looking for something with an intense chocolate flavor, but in normal layer cake form, as opposed to a flourless cake or torte. I found this recipe from Martha Stewart online. I'd love to tell you that it worked perfectly. But, actually, it was a huge mess. The good news is, it tasted fantastic in the end and I think the recipe is a good one, but with one very important flaw. LISTEN UP, MARTHA!

She says to divide the batter between two 8x2 inch round cake pans. It should actually tell you to divide the batter between 3 pans, or at least use 9-inch pans. Trust me; your oven will thank you. Since I was a dutiful recipe follower, my oven got coated with a volcanic explosion of oozing chocolate cake batter that didn't slow down until 30 minutes into the baking time. Finally, the cake sealed itself and I left it to continue cooking, hoping like hell that the whole cake wouldn't smell or taste of burnt chocolate from those hardening masses on the bottom of the oven.

Despite that near catastrophe, I soldiered on and once the cakes were cooled and I removed them from their tiny pans, I cut off the uneven overflow around the top, ate the evidence, and frosted the thing. I frosted the cake with a chocolate buttercream ganache. And it's good. Ooooh, so good! If you love chocolate, you will adore this cake. It was the richest, most chocolaty layer cake I've ever tasted, so I know Grandpa definitely tasted the chocolate! Maybe I should bake more often?
Before frosting the cake, line the bottom edges with strips of wax paper.
Slide them out gently once you have finished for a clean edge.


Grandpa's Chocolate Cake "Ol' 95"
(adapted from Martha Stewart)

1 1/2 cups good unsweetened cocoa powder (like Penzey's),
plus more for dusting
3 cups all-purpose flour
1 Tbsp baking soda
1 1/2 teaspoons baking powder
1 tsp salt
2 cups granulated sugar
1 cup brown sugar
1 1/2 cups buttermilk
3/4 cup vegetable oil
3 large eggs
1 1/2 teaspoons pure vanilla extract
1 cup hot water
1/2 cup strong coffee, still hot

Butter the bottoms and sides of three 8-inch cake pans. Line the bottoms with parchment paper and butter them again. Dust the pans with a few tablespoons of cocoa powder, shaking out the excess. Coat the bottoms and sides completely. Preheat the oven to 350 degrees F (180 C).

Sift together the cocoa powder, flour, salt, baking soda, baking powder, and salt. Place in the bowl for your mixer. Add the sugars to this and mix these dry ingredients together lightly. One at a time, with the mixer going on very low, add the buttermilk, vegetable oil, eggs, extract and finally the water and coffee. Mix together on low for 2 minutes.

Pour the batter between your 3 pans. Bake for about 30 minutes, but check at 25. An inserted toothpick should come out clean when they cakes are done. Let the cakes cool in their pans for 30 minutes, before turning out onto a wire rack to cool completely. Frost cake and serve. Mine made 2 very high layers, or 3 layers if you use 3 pans.Chocolate Ganache Buttercream Frosting
(recipe from baking911.com)

1 cup heavy whipping cream
1/4 cup light corn syrup
2 sticks (1 cup) unsalted butter, room temperature
2 12-oz bags semi-sweet chocolate chips, or chopped bars of chocolate.
2 cups powdered sugar
1 tsp vanilla extract

In a small saucepan, stir together the cream, corn syrup and 1 stick of butter over medium low heat until the butter melts and the mixture barely comes to a simmer. Place the chocolate chips in a large bowl and pour in the hot cream. Stir until the chocolate is completely melted. Let this cool.

Using an electric mixer, cream together the remaining stick of butter and powdered sugar. Once this is smooth, beat in the vanilla extract. Once the chocolate ganache is cooled (enough so that it is mildly warm but not hot) pour it into the mixer and whisk on medium speed until thoroughly combined. Do not over mix this as the frosting can become grainy. This frosting is thin, but let it sit for a few minutes and it will thicken up, or place it in the refrigerator for 5 minutes. The frosting will harden if refrigerated too long, but it can be stirred together again before using to loosen the consistency. Makes more than enough for my 2 layer cake, so there will be plenty for the 3 layers in the above recipe.

October 16, 2006

Blueberry Muffins!

I rarely bake. I'm really not a very well-rounded foodie. Growing up I was quite the baker, but I lost interest along the way. I love cooking dinners, lunches and breakfasts, even many desserts, but let me tell you, it's been awhile since I've made a muffin. Somewhere in my grown-up world, muffins got cast aside as a heavy, calorie laden food that just wasn't worth those calories. I've been quite content spending my food cash at the Sour Cream Imporium, Bacon Fat-o-Rama, and The Ginasium.

However, if anyone can inspire me to bake, it's Ms. Cream Puff herself. She proclaimed these the best muffins ever and she's quite adamant that they will kick your muffin's ass into next week. So, I had to try them. I wanted to bring something baked and homey to my friend Kim. She got married this weekend and since she put me up for the entire time, the only thing to do was to be a good houseguest and bring muffins. And wine. Good pairing, eh? You know...something for the morning and something for the evening!

Next time you're a house guest or are having some, bake up a batch of these and they'll be gone before you know it. These, I'm happy to say, are worth every sinful bite. I got many compliments all weekend about these muffins!

I actually find these muffins incredibly light and airy - not at all like those coffee shop versions that weigh 3 pounds each. They really aren't overly sweet, either, which may surprise you, given all the brown sugar. The topping is just perfectly sweet and crusty which goes so well with the very tender crumb of the muffin. Even those of you who normally only like muffin tops will devour the whole thing, I assure you. You can substitute any fruit you like in these, but if you use berries (fresh or frozen) like I did, toss them with just a teaspoon of flour before folding them into the batter. They won't burst (making your muffins blue) and they will hold their place in the batter instead of sinking to the bottom. A good little tip for any muffins, coffeecakes or breads!Blueberry Muffins topped with Pecan Streusel
(adapted from Cream Puffs in Venice
and
Adapted from The Best of BetterBaking.com by Marcy Goldman)


Streusel Topping:
1 Tbsp cold unsalted butter
1/2 tsp ground cinnamon
1/3 cup brown sugar, firmly packed
a generous 1/2 cup pecans or walnuts, finely chopped

Muffins:
1/2 cup vegetable oil
1 1/3 cups brown sugar, firmly packed
1 1/2 Tbsp lemon zest, grated
1 egg
2 tsp pure vanilla extract
1/2 tsp almond extract, optional
1 cup buttermilk
2 1/2 cups all-purpose flour
1/4 tsp salt
2 1/2 tsp baking powder
1/2 tsp baking soda
1 3/4 cup blueberries (or other fruit: apples, peaches, bananas, coarsely chopped)

Cut together the streusel topping in a small bowl with a fork or pastry cutter. It should be coarse and grainy, like sand. Set aside.

Preheat the oven to 400 degrees F (200 degrees C). Line a 12 cup muffin pan with paper liners. Get out 2 bowls - one for wet ingredients and one for dry.

Mix together the dry ingredients in the bigger bowl (the flour, salt, baking and soda powders). In the other bowl, whisk together the oil, brown sugar, citrus zest and egg. When smooth, whisk in the buttermilk and extracts. Pour the wet ingredients into the flour mixture. Gently mix together until fully combined. Do not overmix. Fold in the fruit with some care. The batter will be stiff.

Fill the batter equally among the 12 muffin cups all the way to the top. Cap each muffin with a hefty amount of the streusel topping. It will seem like a lot, but use it all. Bake for 15 minutes and then lower the temperature to 350 degrees F (180 degrees C) for another 10-12 minutes. Remove from the oven and let rest in the pan for another 10 minutes before transferring them to a wire rack. Makes 12 muffins, obviously. Ivonne says they freeze wonderfully, too!

October 11, 2006

Salmon Cakes

My friends Adam and Emily made me these yummy salmon cakes for dinner one night while I was visiting them in Bloomington, IN. They eat them often as a simple supper and leftovers are put on a sandwich the next day.

We had some leftover cooked salmon so I decided to whip these up. Very similar to a crab cake, this recipe uses salmon as a convenient substitute. You can fry these or bake them, as I did, at 400 degrees F (200 degrees C) for 10-12 minutes.

Salmon Cakes Salad with Spicy Mayo
(adapted from Rachael Ray)

2 large salmon fillets, cooked, or 2 packets or cans cooked wild salmon
1/2 cup bread crumbs, or crushed saltines
1/2 red pepper, minced
1/4 red or green onion, minced
1 tsp minced garlic
2 eggs, beaten
2 tsp Old Bay Seasoning
freshly grated pepper
2 Tbsp fresh chives, chopped
1 Tbsp fresh dill, chopped
1 tsp Tabasco sauce, to taste
1 lemon, zested and juiced

Spicy Mayo:
1/2 cup mayonnaise
2 Tbsp medium salsa
few dashes of Tabasco
few tsp dill pickle relish, optional

Salad Greens of your choice
sliced avocado

Mix together the salmon, eggs, herbs, garlic, onions, peppers, zest, and seasonings. Add the bread crumbs and mix gently to combine. Form 8 salmon cakes from this mixture. If frying them, heat 1/2 inch of olive oil in a skillet and fry the cakes 3-4 minutes per side. Drain well on a paper towel lined plate. If baking, mix 1/4 cup extra bread crumbs with 1 Tbsp olive oil. Place the salmon cakes on an oiled baking sheet and sprinkle with the oiled bread crumbs. This will give it some crunch despite the fact that you aren't frying them.

Dress the salad greens with the juice of the lemon you zested. Arrange 2 cakes per person on top of the greens and lay the avocado slices around the salad. Top each cake with a tablespoon of the spicy mayo. Serves 4.

October 3, 2006

Tomato Basil Soup

So, I come back to you today, fellow food lovers, after a seemingly long absence and what do I have to offer you? Tomato soup. Granted, it's really good tomato soup, but not exactly the show stopper you might have expected after almost 2 weeks of no posts. (And not even a garnish in sight! How lazy can you get?) Sure, I've been making my smoothies religiously, and fixing up some sandwiches for lunch, and there was this bright spot of chili making, but other than that, I've been on hiatus. I wasn't confit-ing duck legs or making my own cassoulet or canning my five bushels of tomatoes like some people I know.

It wasn't my idea, really. I've been forced out. Living with my parents again has presented a few challenges and a big one is cooking. I've realized that cooking became a passion for me because the kitchen was my space. Or rather, I made it my space. For the past 5 years now Paul and I have lived in a small apartment that didn't lend itself to privacy. Paul had his office area and I had the kitchen, I guess. It worked beautifully. But, now that I'm using my parent's larger kitchen, there is no privacy, plus I have to take into account whether they'll eat what I make or not. Feeling their suspicious eyes lurking to ensure I don't make anything too "spicy" kind of takes the fun out of it. Cooking has morphed from my Zen time of the day (where my worries are pushed aside) into a slightly stressful, "where the hell is a spatula? Do you have garlic that isn't in a jar?" type of experience. I don't mean to say I need solitude to enjoy cooking, but it helps.

They don't have a box grater. I don't like their knives. I'm not sure if real carrots are grown in this country anymore because I have yet to see anything besides those alternately dry or slimy, shaved off stumps called "baby carrots." None of my go-to basic produce or pantry items are stocked. I love my parents, but I did not get many culinary lessons from them.

One might say, "Megan, this isn't hard. Go get your items that make you happy. Carve out your little nook in the cupboard and cook as you wish!" Well, that is true. I can do that, and to some extent, I have. But, this also brings up a point I think a few of you might relate to. Being a food snob is something I don't deny. I have high expectations and I'm generally grumpy when I don't completely enjoy what I'm eating. Which isn't to say I'm picky, but I feel deeply for that wasted meal. But, when cooking for others who are not as interested in food, who don't love richly flavored food, who have odd "no onion" policies and such - or just really dig KFC - what do we do with these people? How do I cook what I want to cook without being elitist? And when did caring about what you put into your mouth become a snobby way to live? Why do I feel guilty for not using that bottled salad dressing or pre-shredded cheese?

As I was making this tomato soup today my Dad passed by the kitchen and said, "oh, you're at work!" and I thought about how usually it's exactly the opposite. It's not work, it's joy.

The secret to a great tomato soup is adding brown sugar. It cuts the acidity of the tomatoes, especially when using the canned variety. Serve with your favorite grilled cheese. I recommend a goat cheese and fresh basil combo if you're sick of cheddar.

Tomato Basil Soup

1 tsp olive oil
1 small onion, chopped
1 carrot, peeled and diced
3 cloves garlic, minced
3 Tbsp white wine
2 tsp dried basil, or 2 Tbsp fresh
1 tsp dried oregano
1 1/2 cups chicken stock
1 (28-oz) can fire-roasted crushed tomatoes (Muir Glen)
1 (8-oz) can tomato sauce
1 Tbsp brown sugar (to taste)
1/4 cup half & half or heavy cream, optional

Sauté the onion, carrots and garlic in the olive oil for 5 minutes over medium heat. When the onions are tender, pour in the white wine and cook until all the liquid has evaporated. Stir in the dried herbs and some salt and pepper.

Pour in the chicken stock, crushed tomatoes, tomato sauce and brown sugar. Bring to a boil and reduce the heat to a simmer. Cover and cook 30 minutes. Taste for seasoning and add more brown sugar if it is too acidic. Add the fresh basil, if using. You can puree the soup in a blender at this point if you would like a smoother texture. Do it in batches; only fill the blender half full when blending hot liquids. Return the soup back to the pot.

Remove from the heat and stir in the cream. This soup could be simmered for hours to deepen the flavor or made the day before. Add the fresh basil and cream just before serving. Serves 4.

September 27, 2006

Sausage Stuffed Acorn Squash

My mom made this festive fall dish the other evening and I wanted to pass it along to all of you. It was really delicious! This dish definately tastes like fall!

I love squash in all forms - pureed in soups, roasted or mashed - and with this recipe you'll get a nice serving of it! Despite containing sausage, this is actually a pretty healthful, well-balanced dish. And with all the super lean sausage available at supermarkets now, you can find really flavorful low-fat options. This stuffed squash is colorful and looks great on the plate, plus, the method of this recipe could be applied to many other flavor combinations should you want to experiment with it.

This recipe comes from Taste of Home's Simple & Delicious magazine. A few years ago I would've been really skeptical about recipes coming from Taste of Home as most often they contain one, if not many, processed ingredients like canned soup, jello or cool whip. But, recently, I've seen less of these items and recipes that seem, at least at a glance, to have more flavor and fresher ingredients. The photography is nice and since there aren't any advertisements, it's pretty pleasing to flip through. It's still a little bit country for me and I doubt I'll ever turn to it for inspiration, but it's not too bad! I think I've also just moved on from needing recipes like most of the ones published. It feels good that I can concoct something like scalloped potatoes, an easy pasta dish, or a vegetable soup without staring down a recipe.

Microwaving the squash speeds up the prep time for this dish and finishing it in the oven browns the top nicely and brings it together. If your squash are really big and you think half of a squash is too big of a portion, I'm sure you could cut the squash into quarters and simply pile the stuffing on them as best you can. Enjoy these fall flavors!

Sausage-Stuffed Acorn Squash

2 small to medium acorn squash
1 Tbsp butter
1 pound bulk spicy pork sausage (Italian or whatever flavor you like)
1 small onion, chopped
1 egg
2 Tbsp milk
1 cup fresh baby spinach, chopped (use frozen because of this!)
1 1/2 cups soft fresh bread crumbs
1/2 cup dried cranberries

Slice the squash in half (vertically, through the stem). Remove the seeds and place the squash face up in a microwave-safe dish. Season with salt and pepper and dot the inside of each half with butter. Cover and microwave 10-12 minutes, or until tender.

Cook the sausage in a skillet over medium-high heat, breaking it apart with a spatula. Add the onion and cook 5 minutes. When the sausage is browned nicely, drain as much fat off as possible.

Beat the egg and milk together in a large mixing bowl and add the bread crumbs, dried cranberries, spinach, sausage and onions. Mix well.

Stuff each half with 1/4 of the sausage mixture. Bake for 15-20 minutes in a 400 degree F (200 degree C) oven. Remove when warmed through and slightly browned on top. Serves 4.

September 25, 2006

Pumpkin Recipes!

A while ago, I submitted this yummy Pumpkin Soup with Cumin and Cilantro to Meeta, of What's for Lunch, Honey?, for her From My Rasoi event. The theme was pumpkin and well, now there are all kinds of delicious looking recipes posted here that include pumpkin! Go check them out!

I'll be back soon with more recipes and stories!

September 20, 2006

Turkey Chili

I made this for my parents tonight after a friend of mine recommended the recipe to me. I was excited for the first chili of the season and it was quite appropriate to make tonight since the temperature hovered around 50 degrees today and got even cooler in the evening. Bring on the chili! You get the oyster crackers and I'll grate the cheese! (Didn’t everyone grow up with oyster crackers in their chili?!?)

It tasted great and was very satisfying, although I must confess that with a title like Turkey Chili with White Beans, the appearance that comes to mind is more of a white chili. But, this more closely resembles a regular ground beef chili with slightly less of a tomatoey sauce. I really enjoyed the heat level in it and there are also a good amount of beans in there, which I love. I used Penzey's medium hot chili powder (actually, all the spices were Penzey's) so I used a bit less than called for, and Penzey's cocoa powder, which is about twice as strong, so I used less of that, too. It was a good reminder to me that you can use less of good quality spices - and must use a lot more with crap supermarket brands - to achieve the same amount of flavor called for. (I could write a whole blog about Penzey's! I'm such a fan - especially their extra fancy Vietnamese cinnamon!)

This one is a keeper for a somewhat healthier chili with lots of depth while still being easy to put together. Leftovers would be great over a plain baked potato!

Turkey Chili with White Beans
(an Epicurious recipe)

1 tablespoon olive oil
1 large onion, chopped
2 teaspoons dried oregano
1 1/2 teaspoons ground cumin
1 1/2 pounds lean ground turkey (I used a little less)
1/4 cup chili powder
2 bay leaves
1 tablespoon unsweetened cocoa powder
1 1/2 teaspoons salt
1/4 teaspoon ground cinnamon
1 28-oz can whole tomatoes
3 cups beef broth (low sodium)
1 8-oz can tomato sauce
3 15-oz cans small white beans, rinsed, drained

1/4 cup chopped fresh cilantro, optional
grated cheddar cheese, optional
sour cream, optional

Heat the olive oil in a large dutch oven over medium heat. Add the onions and cook 5 minutes until translucent. Add the oregano and cumin; cook and stir for 1 minute. Add the ground turkey to the pan and break apart with a spatula. Brown and cook, stirring, for 5 minutes. Stir in the chili powder, bay leaves, salt, cinnamon, and cocoa powder. Let these spices cook for about 1 minute.

Pour in the canned tomatoes and break them apart a bit. Stir in the tomato sauce and beef broth. Bring this to a boil and reduce the heat to a simmer. Cover and let simmer for 45 minutes, stirring occasionally.

Stir in the white beans and cilantro and cook 10 minutes more. Taste and adjust seasonings. Serve topped with cheese and sour cream, if desired.

September 19, 2006

Fruit Smoothies!

Since moving back to the States I’ve struggled with eating a balanced diet while enjoying some of the foods I’ve missed most. We’ve been eating out a lot, which has made me feel rather overloaded and craving simple, good homemade food.

Mostly, it’s been strange to adjust to finding so many packaged foods stocking my family’s shelves. It’s something I’m trying not to be too difficult about, but I am bothered by the amount of “easy” yet illogical shortcuts that so many of us seem to go for when it comes to cooking. Just to see each new and improved something-or-other is enough to numb the mind. I’m just surprised at the amount of advertising there is on every surface that we Americans look at. I see it as amazingly insulting for companies to think that all these eye candy claims of “less fat, more flavor” yada-yada will make us buy their products.

The other night we had some frozen peas that were so proud of themselves because they could be microwaved in their own packaging. I’m so happy to have saved those 10 seconds of opening the bag and putting them in a dish. Damn. Is anybody else thinking about how stupid we all must be if we’ve been conditioned to see this as some huge advantage?

Harrumph! Anyway, other than little spurts of self-righteous mumbling, I’ve been trying to make smart eating choices. And I don’t mean I’m trying to eat only extremely healthy foods, I’m just trying to eat natural foods - foods that haven’t been heavily salted or processed, like raw nuts, breads that don’t contain a ton of preservatives, fresh fruit and veggies, and plenty of protein. And despite that fact that I'm a driver again, I try to walk places occassionally, too!

These fruit smoothies are my new favorite breakfast and I’m on a mission to convert you into a smoothie-maker if you aren’t one already. My in-laws have one every morning and turned me onto the idea. With drinking a large smoothie every morning for breakfast, I get all of my servings of fruit for the day out of the way, plus with the added protein powder and soy yogurt, I’m not starving by the time lunch rolls around. It’s just the best way to start the day! I can’t tell you how good it feels. (If you are hesitant about using protein powder, don't worry about it - it's not just for body building! Protein with each meal is a good idea!)

Maybe you’ve made smoothies before…maybe you’re not that excited by the idea, but let me tell you that this is different. This is the ultimate creamy milkshake. You must try it!
Fresh Fruit Smoothies

1 banana, peeled (or 2 short ones)
½ cup blueberries
½ cup strawberries
2 apples, peaches or pears
¼ cup pomegranate juice
1 to 1 1/2 cups vanilla soy yogurt (I like a lot in mine!)
1 scoop (about 2 Tbsp) soy (or whey) protein powder
about 1 1/2 cups ice cubes

Smoothies are, by nature, variable things, so you may want to play around with the amounts to suit your liking. I can tell you that I like mine light on the ice, which makes the milkshakey texture that I like. The combination of pomegranate juice, blueberries and soy protein is amazingly good for you, too. Play around with your own favorite combos.

Rinse all of the fruit in cold water. Peel the bananas and slice or roughly break apart the larger pieces of fruit. Puree all of the fruit in a blender until smooth, adding the pomegranate juice as needed. Once the fruit is smooth, with the blender running, add in the yogurt, protein powder, and finally, the ice. Blend until smooth and frothy. Makes 2 large, all-you-need for breakfast servings.

Enjoy – with a straw!

P.S. I enjoyed this beautifully colored smoothie this morning and the proportions went like this:

1 cup of my mom's homegrown blueberries, frozen
1/4 cup organic apple juice
1 cup vanilla soy yogurt
2 small peaches
2 short bananas
1 heaping Tbsp soy protein powder
1 cup ice cubes

Having frozen blueberries let me decrease the amount of ice, and I find that I enjoy a lot of yogurt in my smoothie for a really creamy texture and sweet taste - so I could've used more than one cup. Experiment as you see fit!

September 16, 2006

My 100th Post!

Oh, Blog, How I've Missed You! After over a week without blogging, I hope to get back into the swing of things soon.

This is my 100th post and I thought I'd mark the occasion by making a list of my favorite posts and some of the recipes that I make most often. I've had some fun reading over some of my old posts and I hope you will too! Here we go!

The Repeat Offenders in my Kitchen are:

Chicken Curry with Cashews is something Paul and I crave.

Chicken Enchiladas are fun to make together and always great to make in quantity to have leftovers to go in the freezer for whenever you need a quick meal!

Taco Salad with Chicken and Black Beans
always satisfies on a hot day!

This
Boeuf à la Bourguignon was a lot of work, but just about the most amazing stew I've tasted!

Salade au Chèvre Chaud will always bring back memories of Paris to me.

Cool Autumn days will be begging for this Soupe à l’Oignon Gratinée.

Roasted Cauliflower has become a staple side dish at Chez Mégane.

Quiche did become a standard for us in Paris...this time Zucchini and Tomato Quiche!

Tina's Vegetable Filled Crêpes are comfort food at their best!

This Strawberry Clafoutis has been one of my favorite desserts this year!

Who couldn't love these Chocolate Brownie Cookies?

Gin & Tonics...but you knew that already!

My Favorite New Recipes Tried Last Year!

Tartiflette was one of the more satisfying things I've made. It's a rich, heavy French dish of the very best kind!

Tzatziki makes the most wonderful appetizer dip.

Black Bean Lasagna was a really really good tasting recipe I concocted one evening. I know it will stick around and make appearances at dinner more often!

What are your staple dishes? What's the best new thing you've tried lately?

September 6, 2006

Salmon, 2 Ways!

We were served a wonderful dinner on our 2nd wedding anniversary last Sunday. We're often treated to fantastic Sunday dinners with Paul's family and it has become one of the best parts about coming back to visit. After all, the first time I ever met his family was one Sunday evening 8 years ago.

I remember there being Tater Tots for dinner, among other things, although I'm not sure Paul's Mom would remember it that way. I say that because she is a magnificent cook and the idea of her serving tater tots is so far removed from her normally elegant dinners, it is almost laughable. This dinner last Sunday, however, did not include frozen potatoes, but instead this elegant salmon, mashed red-skinned potatoes, a spinach salad decked out with tomatoes from the garden, kalamata olives and fresh mozzarella, and perfectly seasoned pencil-thin asparagus spears. It was SO good. Isn't there something fantastic about pairing salmon and asparagus?

Paul still had his very rare filet mignon since he's like that, but the rest of us made quick work of devouring this salmon. Paul's mom enjoys it because, "you can't taste the salmon," but I enjoy the taste of salmon and I still think this is great! It's also really simple and healthful.

Roasted Salmon with Macadamia Nut Crust


3 Tbsp unsalted butter, divided
1/4 cup macadamia nuts, coarsely chopped
1 full salmon fillet, about 2 1/2 pounds, skin on and any bones removed
1-2 Tbsp fresh lime juice
1/4 cup chopped cilantro

Preheat the oven to 450 degrees F (230 C). Melt 2 tablespoons of butter in a skillet and add the macadamia nuts. Cook 2-3 minutes until lightly browned. Remove them from the heat.

Melt the remaining tablespoon of butter in a roasting pan. (Place in the oven for a few minutes). Place the salmon filet in the roasting pan and season with salt and pepper. Spread the toasted nuts over the salmon. Bake for 10-15 minutes depending on the thickness of your fish.

Transfer the salmon to a serving platter. Sprinkle the cilantro and fresh lime juice over the salmon before serving.

Two days later, my Mom served us this grilled salmon. It's her staple salmon recipe and it's just as delicious as more complex preparations. I'm so happy to finally have the recipe because I always enjoy it so much. I don't have a picture, but it looks great; I promise! There isn't really a dominant flavor, but a nice balance between the soy sauce, basil, lemon and parmesan. This is also nice because the skin on the fish stays on the pan while the filet can be lifted off easily for serving.

Obviously, our moms have perfected the easy-to-fix yet flavorful salmon recipes! Try this one soon!

Grilled Salmon with Herbed Lemon Parmesan Crust

1 pound salmon fillets
2 Tbsp lemon juice

2 Tbsp red wine vinegar

1 tsp grated lemon zest

2 tsp dried or fresh basil

1 tsp garlic powder

2 tsp soy sauce
3-4 Tbsp freshly grated parmesan
salt and pepper


Combine the lemon juice, zest, vinegar, basil, garlic powder and soy sauce in a small cup or bowl. Place the salmon fillets (can be in individual fillets or one big piece...) on a foil lined roasting dish. Season lightly with salt and pepper.

Pour the lemon soy sauce evenly over the salmon and sprinkle with parmesan cheese.
Put the pan on a medium-high grill and cover. Cook 15-20 minutes, or less for smaller fillets. Alternately, roast in a high heat oven (425 degrees F) for 15-20 minutes, depending on the thickness of your salmon.

For an expert description of how to perfectly cook fish, look here at Beyond Salmon for this great explanation, and much more info about cooking all types of fish!

I'm sending these recipes over to Kalyn's Kitchen for Weekend Herb Blogging - Go check out all the other
herbaceous recipes this Sunday!